Work with solutions
Measurement of liquid volumes[edit | edit source]
Measuring vessels and other tools in the chemical laboratory[edit | edit source]
When preparing solutions and handling liquids, we use various laboratory containers and tools. They differ in the purpose for which they are to be used and in accuracy. Maintaining the temparature is important because the density of the liquid changes with temperature.
Measuring vessels are usually calibrated 20 °C (in the US 25 °C). The calibration temperature is marked on each measuring container.
Aids for measuring the volume of liquids Aid Usual volume range Accuracy Erlenmeyer flask, beaker 5–5000 ml indicative only Measurign flask 5–2000 ml high Graduated cylinder 5–2000 ml medium Burette 1–100 ml high Pasteur pipette, dropper 1–5 ml small Glass pipette 1–100 ml high Automtic pipette 5–5000 μl high Automatic dispenser 0,1–100 ml medium Micro syringe 0,5–1000 μl high Piston valve dispenser 1–500 ml medium
Beakers[edit | edit source]
Beakers are used for indicative determination of liquid volumes. In addition to rough measuring of volumes beakers are mainly used for dissolving substances, diluting liquids, heating and other laboratory operations. Because of the low measurement accuracy, they are usually not even classified as measuring containers.
Measuring flasks and measuring cylinders[edit | edit source]
Measuring flasks and measuring cylinders are calibrated "for filling", which is marked on them with the mark D according to the Czech "dolít" or IN according to the English "include". After filling up to the appropriate line, the liquid inside the container has the exactly indicated volume. If we pour the liquid into another container, a certain amount will remain in the form of a thin film or drops on the walls, so by pouring we transfer less than the indicated volume.
Volume is usually given in milliliters. When measuring, the container must stand on a firm, horizontal support. The correct volume is measured if the meniscus of the liquid touches the mark on the container with its lower edge. Measuring cylinders are only used for approximate measuring, measuring flasks are used to prepare solutions with a precise concentration.
Burettes, pipettes, dispensers and syringes[edit | edit source]
Burettes, pipettes, dispensers and syrines measure the volume of liquid taken into antoher container.
Pipettes and burettes are usually calibrated „for pouring“, marked V according to Czech "vylít" or Ex according to the English "exclude". The liquid flowing from the respective lines has the indicated volume. We do not blow out the contents of the pipette, even if a drop remains in the tip. Its volume is taken into account during calibration.
- Burettes
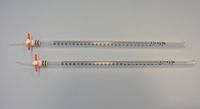
They are used in titrations, or where the same volume of liquid is repeatedly measured. These are glass or plastic calibrated tubes closed by a tap. The burette is fixed vertically to the stand using a holder. With the tap closed, it is carefully filled with the appropriate liquid using a funnel. The funnel is removed and by slightly opening the tap, such an amount of liquid is released that its lower meniscus touches the mark. Then the burette is ready for titration. The titration agent is discharged through the tap and its volume is monitored on the scale. One of the most important actions when working with a burette is the correct reading of the volume. It is always read twice on the burette. The first time when determining the zero mark, the second time when subtracting the drained volume. Since the change in volume is subtracted, the method of subtraction does not matter much. However, it must always be subtracted in the same way.
- Automatic burettes are used in routine laboratories.
- Glass pipettes
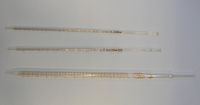
- They are rarely used to measure volumes in modern routine laboratories and are being replaced by semi-automatic dispensers. The volume of glass pipettes can be different, from 1 to 100 ml. They can be either undivided, designed to measure a single volume, or divided - usually in milliliters and tenths of milliliters. The scale can point from the tip towards the top edge or vice versa.
- For safety reasons, we never suck the solution into the pipette by mouth - different types of attachments or pistons are used to draw it.
- When suctioning, the pipette must not rest on the bottom of the container. Before measuring the sample, the pipette is first filled with the solution and the collected volume is drained into the waste container. Only then is the exact volume taken and transferred to a container for further processing. The solution must never enter the pipette tip.
- Automatic pipettes (pipettors, micropipettes, microdispensers)
- One option for measuring small volumes is the use of automatic pipettes.
- Microsyringes
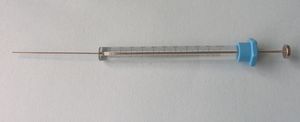
- They are used for precise dosing of small amounts (0,1–1000 μl) of liquids. They consist of a needle attached to a graduated glass cylinder in which a piston moves. Individual types differ in needle and piston diameters.
- Piston valve dispensers
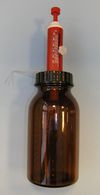
- They consist of a piston with a scale, which is mounted on storage bottle. They enable the repeated dosing of a certain volume of liquid from the storage bottle. Dosers intended for dosing of aggressive chemicals (e.g. strond acids) have glass parts made of borosilicate glass, plastic parts that are in contact with the liquid are made of PTFE, other parts are made of PE or PP. In modern types of dispensers, dosing is automated using control modules.
Automatic pipettes[edit | edit source]
According to the control method, we distinguish between manual and electronic automatic pipettes. In manual pipettes, the plunger is moved with the thumb using the control button. The correctness and accuracy of pipetting is significantly influenced by the experience and skill of the worker. In the case of electronic pipettes, the piston is moved by an electric motor. Compared to manual methods, it also offers programming of the pipetting method. Depending on the nature of the liquid. you can choose a different speed of piston movement when sucking in an expelling the liquid.
A disposable tip is attached to the body of the pipette (also called pipettor). The pipetted liquid comes into contact only with this tip.
According to the principle of their operation, automatic pipettes can be divided into two basic types:
- „Air displacement“ pipettes
- This type of pipette uses the so-called air cushion principle. A certain volume of air always remains between the piston and the liquid. The volume of liquid drawn into the tip by the pipettor may differ slightly from the volume of air drawn in or pushed out by the piston, depending on the density and viscosity of the pipetted liquid, the wettability of the tip surface by the pipetted liquid, temperature and atmospheric pressure, and other influences. Therefore, the pipettor must be regurarly calibrated and adjusted.
- Pipettes of this type are distinguished according to their design as single-channel (intended for pipetting one volume of a given liquid in time) or as multi-channel (most often eight or twelve-channel) intended for simultaneous pipetting of the same volume of a given liquid into several wells in a microtiter plate. Each channel in multi-channel pipettes has its own piston, therefore it is not necessary to use all channels at one (less than 8 or 12 tips can be connected).
- Automatic pipettes are designed either for one fixed volume or are adjustable for multiple volumes. Changing the volume setting is possible within a certain range (e.g. 10-100 μl) using the adjusting screw or knob.
- „Positive displacement“ pipettors
- This type of pipette sucks liquid into the tip directly without creating an air cushio, i.e. the piston is in direct contact with the measured liquid. The liquid sucked into the tip (without air bubbles) is discharged all at once (syringe type) or in steps of the same volume (stepper pipette). This type of pipettor is convenient to use for highly viscous or volatile liquids, or for repetitive pipetting.
Ways to use a pipettor[edit | edit source]
Direct pipetting[edit | edit source]
This is the most commonly used pipetting technique. During direct pipetting, a precisely set volume is sucked into the tip and in the next step it is completely pushed out of the tip into the selected container. Because a certain amount of liquid remains on the inner surface of the tip as a thin film, it is necessary to wet the tip with the measured liquid before pipetting. The direct pipetting technique is used for measuring most aqueous solutions, buffers, dilute acids and bases.
Method[edit | edit source]
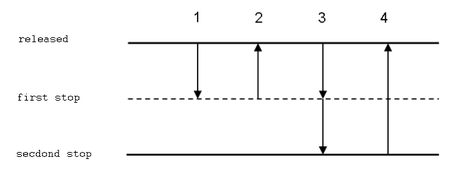
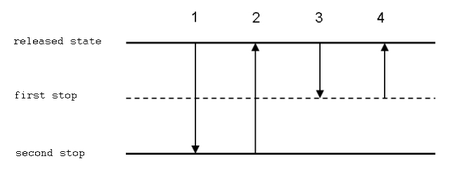
- Place the tip on the dispenser. Press the controller button to the first position (a small resistance must be overcome when pressing the button).
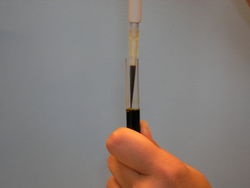
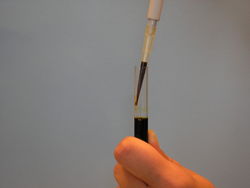
- Dip the tip of the dispenser about 2-3 mm below the solution level. Slowly release the pressed button on the controller while sucking the sample into the dip.
- By slowly sucking the liquid into the tip, the possible formation of turbulence is limited, which can cause the formation of aerosol and gas bubbles coming out of the liquid. The optimal speed depends on the properties of the liquid (its density, vapor tension and viscosity).
- Always check whether air bubbles have entered the tip (e.g. when the piston is opened more sharply or the tip is incorrectly fitted).
- For greater pipetting accuracy, remove your thumb completely from the controller button once it reaches the home position.
- Slowly withdraw the tip from the liquid. Some of the contents of the tip may be lost when pulled out quickly. Wait, especially for larger 500–5000 μl pipettors, about 1-3 seconds before pulling the tip ouf of the liquid.
- When expelling the liquid, hold the tip at a slight angle agains the wall of the container (10–45º), just above the solution already in it, and smoothly press the control button with your thumb to the first positio. Wait about 1 second and continue to quickly press the controller button to the second position (you will feel more resistance when pressed). Make sure that no droplets of liquid remain in the tip or splash on the wall of the container.
- Hold down the controller button and pull the tip out along the wall of the container. Now enable the controller button.
In direct pipetting, a certain error is created by the fact that a very thin film of the tranferred liquid remains on the inner surface of the tip. With the mentioned procedure, we measure a slightly smaller volume than is set on the pipette, while the error depends mainly on the properties of the pipetted liquid and the material from which the tip is made. This error can be eliminated by wetting the inner surface of the tip with the measured liquid before pipetting. In practice, this means that we first suck the solution into the tip using the procedure described above, but instead of measuring it into the target container, we return it back to the storage container. At this moment, a film of pipetted liquid is formed on the inner wall of the tip, in the case of colorless solutions it is invisible to the eye with the correct technique. This is followed by measuring the liquid exactly according to the above mentioned procedure (only we do not insert a new tip.) Since the amount of liquid that remains in the tip is practically constant, we now measure the actual set volume.
If drops remain on the outer wall of the tip, it is possible to wipe them a cotton wool with a light movement from top to bottom. Never touch the mouth of the tip with the cotton wool, otherwise you will suck out some of the liquid inside.
Reverse pipetting[edit | edit source]
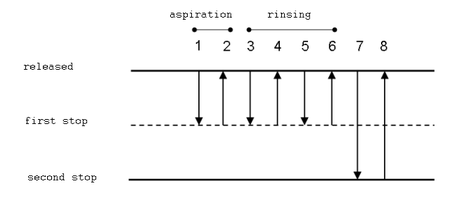
In reverse pipetting, we draw a larger volume of liquid into the tip than we want to measure, and in the next step we push out the volume set on the pipette from the tip. This method of pipetting gives better results when working with viscous or highly volatile liquid, strongly wetting liquids and solutions that foam. It is also suitable for measuring very small volumes. After pipetting, there is always a residue of liquid in the tip, which can be squeezed back into the storage container or into the waste before removing the tip itself.
Method[edit | edit source]
- Press the button to the second position (you will feel first a weak and then a greater resistance of the piston when pressing the button of the controller).
- Dip the tip of the dispenser about 2-5 mm below the surface of the solution. Slowly release the plunger while sucking the sample into the tip.
- Slowly withdraw the tip from the liquid and remove any droplets adhering to the outer wall of the tip by touching the tip to the rim of the container.
- When expelling a given volume of liquid, hold the tip at a slight angle against the wall of the container just above the solution, that is already in it, and slowly and smoothly press the control button the the first position with your thumb.
- Hold the controller button down in this position and pull the tip out of the container.
- Push the part of the liquid that remains in the tip back into the original container or into the waste by pressing the controller button to the second position.
- Hold the controller button down and pull the tip ouf the liquid, then release the controller button.
Repetitive pipetting[edit | edit source]
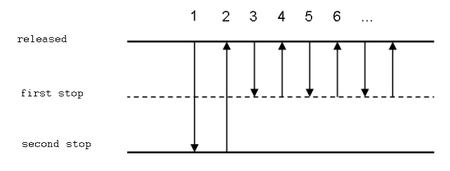
This method of pipetting is intended for repeated pipetting of the same volume, e.g. for adding a reagent to a series of tubes or to wells in a microtitre plate. This is actually repetitive reverse pipetting. After sucking the liquid into the tip, repeat steps 2 to 4.
Pipetting of heterogeneous samples[edit | edit source]
A technique suitable for pipetting heterogeneous samples such as blood, when it is not easy to rinse the tip before pipetting. It is similar to the direct technique, but the tip is not pre-wetted with the measured liquid. Instead, after the liquid has been transferred, it is repeatedly flushed with the solution with which the measured liquid is mixed.
Method[edit | edit source]
- Press the button to the first position and dip the tip of the dispenser about 2-5 mm below the level of the solution.
- Slowly release the plunger while sucking the sample into the tip.
- Slowly withdraw the tip from the liquid and remove the drops of solution adhering to the outer wall of the tip by pulling the tip along the wall of the container.
- Dip the tip of the dispenser into the cílového roztoku.
- Press the control button to the first position and then slowly release it to the original position. This will draw the solution into the tip. Do not remove the tip from the solution and repeat this step until the inside of the tip is clean.
- Pull the tip along the wall above the solution level and empty it by pressing the controller button to the second position.
- Hold down the controller button and pull the tip out of the contrainer along the wall and then release the controller button.
Preparation of solutions with a given concentration[edit | edit source]
Mass concentration: ρB = mB / V (g/l)
Substance concentration (molarity): cB = nB / V (mol/l)
Mass fraction: wB = mB / m
Diluting and mixing solutions: c1V1 + c2V2 = c3(V1 + V2)
Dilution number (dilution factor): D = (Vkonečný / Vpůvodní)
A D times diluted solution with a volume of Vfinal is prepared from 1 part of the original solution (Voriginal) and (D−1) parts of the solvent rozpouštědla (e.g. 5 times diluted solution is obtained by mixing 1 part of the original solution and 4 parts of water).
In Anglo-Saxon terminology, we also encounter the term dilution ratio, whichc expresses 1 part of the original solution to D parts of the total volume (1/D = Voriginal / Vfinal). According to this concept a solution diluted 1:D is the same as a solution diluted D times (e.g. a solution diluted 1:5 is a solution prepared from 1 part of the original solution and 4 parts of water, i.e. diluted 5 times).
Practical task Preparation of solutions with a given concentration
Photometric verification of concentration[edit | edit source]
When electromagnetic radiation from the ultraviolet or visible part of the spectrum passes through the measured solution, it is absorbed. The amount of absorption depends on the wave length of the radiation, the concentration of the absorbing substance in the solution and the thickness of the measured layer. At a given wavelength of radiation, there is a direct relationship between the concentration of the absorbing substance and a quantity called absorbance (A). This dependence is expressed by the Lambert-Beer law: A = εαc l, where εα is the molar absorbtion coefficient (its value corresponds to the absorbance of a substance with a concentration of 1 mol/l and a thickness of the measured layer of 1 cm), c is the substance concentration (mol/l) and l is the thickness of the measured layer (cm). The given relationship is valid only for monochromatic radiation and for dilute homogeneous solutions. For absorbance measurement, the wavelength corresponding to the absorption maximum of the substance to be determined is usually chosen.
Practical task Photometric verification of concentration
- ↑ ČMELÍK, Milan – MACHONSKÝ, Lubor – ŠÍMA, Zdislav. Fyzikální tabulky. 2. edition. Liberec : Technická univerzita v Liberci, 2005. 60 pp. ISBN 80-7372-009-4.


